NormCap v0.4.0

OCR-powered screenshot tool to capture text instead of images.

Packages with the latest changes for your system:

... alternatively use FlatHub, AUR or install the Python package.

Features

Characteristics and functionalities that make NormCap interesting.

Many languages
Works offline
Heuristic parsing
Multi monitor
Cross-platform
Free & Open Source

Usage

A short guide for using NormCap and its most important features.

Quickstart

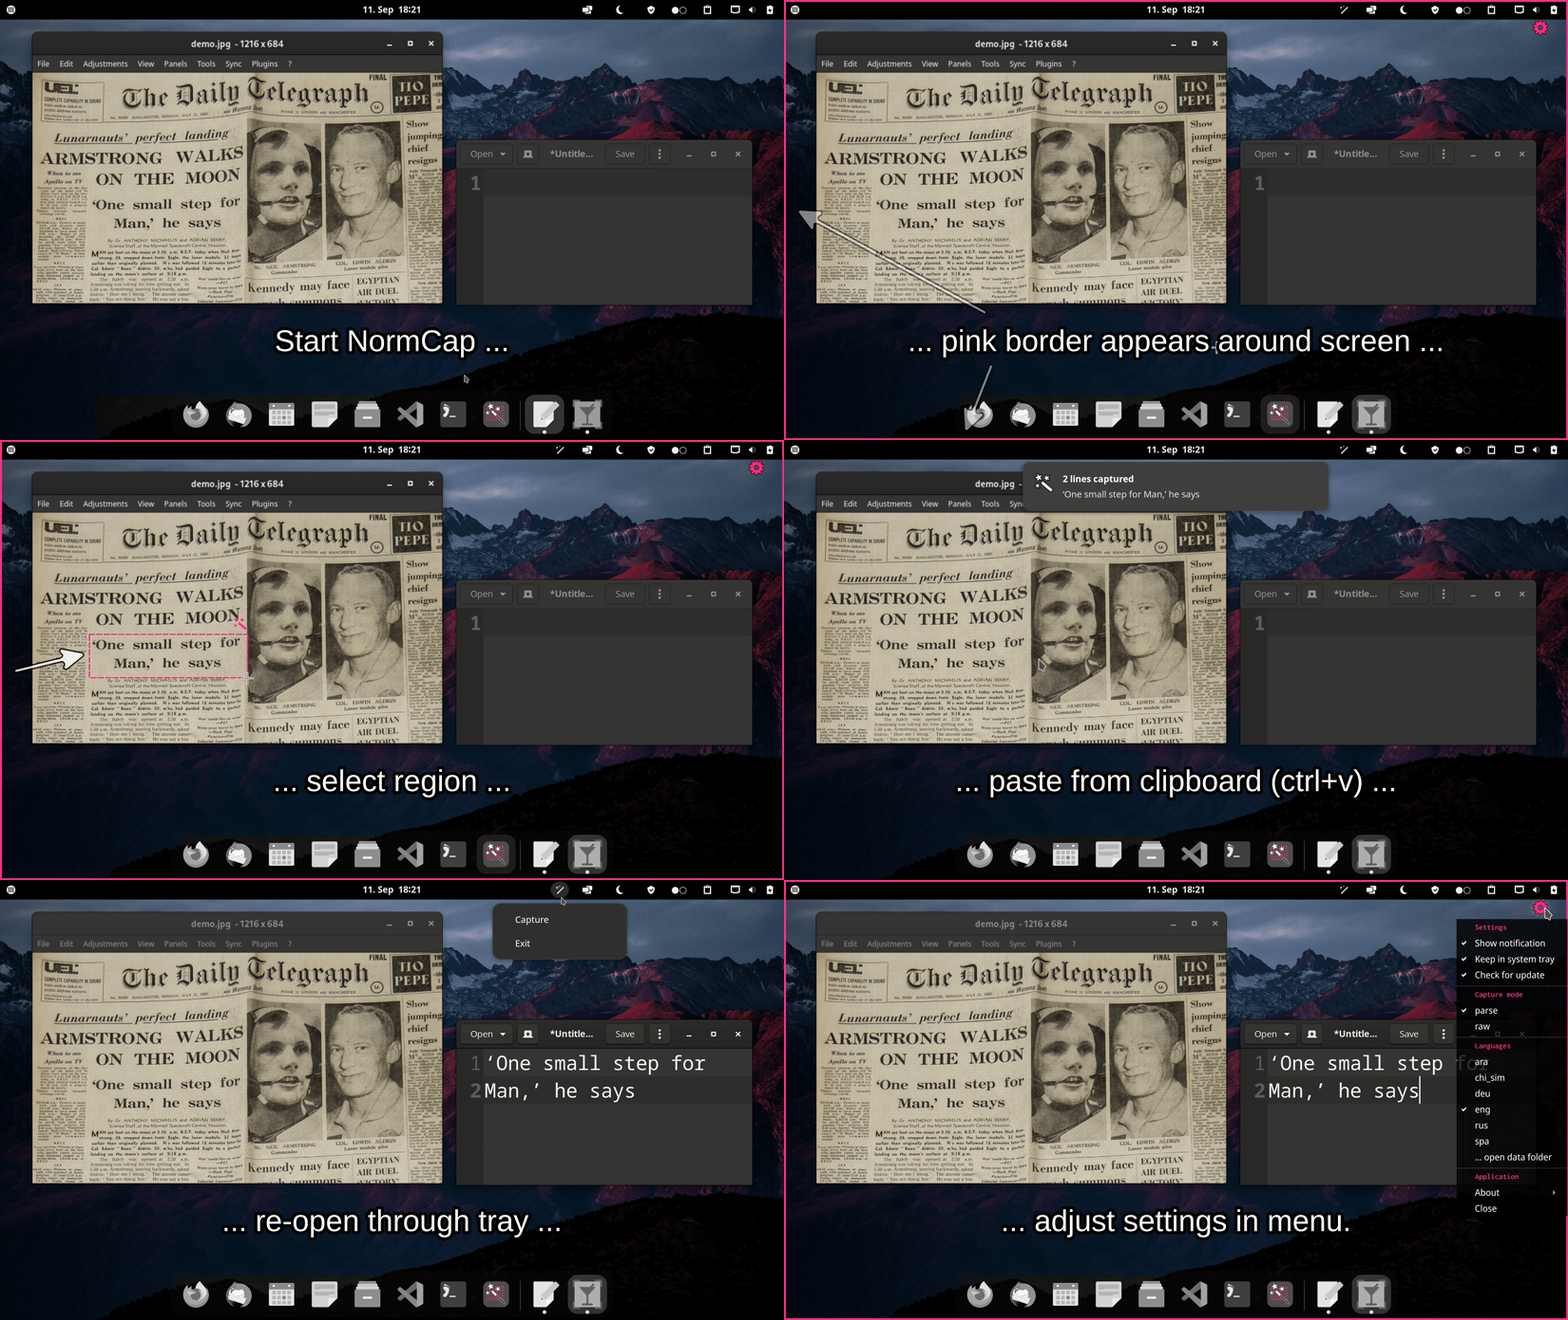
  1. Start NormCap and wait until a pink border appears.
  2. Select a region on screen with your mouse.
  3. Wait for notification or pink tray icon.
  4. Paste the recognized text from the clipboard anywhere you like.

Example use-cases

User Interface

Capture Modes

The settings menu allows switching between the two capture modes: "parse" and "raw":

Support

When things did not go as expected.

You need support with NormCap?
You want to support NormCap?
Not at all satisfied with NormCap?

Try an alternative application and see if they work better for you.

Frequently Asked Questions

A knowledge base for common issues and additional information.

General

How can I add additional languages to NormCap?

The prebuild packages are shipped with support for English only. To install additional languages, click the settings icon and in the "Languages" section of the menu "add/remove...".

If you installed NormCap as Python package, refer to the online documentation on how to install additional language for Tesseract on your system.

How can I improve the detection accuracy?

The most import thing is to specify the correct language(s) (via settings menu or the --language command line argument). Keep in mind: selecting multiple languages at once slows down the recognition a bit.

Sometimes Tesseract struggles with recognizing text with just very few characters, like a single word. In this case try selecting a larger portion of text.

The prebuild NormCap packages are shipped with the tessdata-fast models, which offer a very good accuracy to speed compromise. But you can also try to add the models from tessdata or tessdata-best instead as described above.

If the results are still bad, please submit a screenshot of the text you are trying to recognize as an issue.

Is my image/text analyzed in The Cloud™?

No. The text recognition is performed offline using the OCR framework Tesseract.

Is any other data send to the internet?

No telemetry data is collected and by default also no other data is sent anywhere.

However, some (optional) features require accessing resources on the web and therefore expose minimal information (like IP address) to the accessed server:

  • If you enable the check for updates on start, the application checks NormCap's releases page on GitHub.
  • If you download additional languages, they are being fetched from GitHub, too.
Can I start NormCap via a keyboard shortcut?

Yes, but you'll have to configure it on your own using your operating system's tools:

Ask your preferred search engine for support or different ways to do this.

Why is the Windows-Installer's file size so large?

NormCap's MSI installer is much larger than the ones for Linux and macOS because the included Tesseract binaries are larger.

NormCap used to include a set of smaller binaries, which resulted in more consistent installer file sizes for all operating systems. Unfortunately, they seemed to lack some dependencies and lead to issues on some Windows systems. Hopefully, the larger binaries will fix this issue. This decision is not set in stone, so please feel free to leave some feedback regarding this topic!

Are there alternatives to NormCap?

Some applications offer similar features like NormCap and might be a good or even better alternative for you: It completely depends on your use case and requirements. Some similar open-source Projects are:

Troubleshooting

How to get debug information?

You can start NormCap from the command line with the verbosity option to get an idea about what it is doing. The command to run depends on the OS and install method.

  • With Python package:

    Run: normcap -v debug

  • On Windows (MSI):

    Run: %LOCALAPPDATA%\Programs\dynobo\NormCap\NormCap.exe -- -v debug

  • On macOS (DMG):

    Run: /Applications/NormCap.app/Contents/MacOS/NormCap -v debug

  • On Linux (AppImage):

    Run: ./NormCap-{version}-x86_64.AppImage -v debug

  • On Linux (FlatPak):

    Run: flatpak run --command=normcap com.github.dynobo.normcap -v debug

  • On Linux (AUR):

    Run: normcap -v debug

NormCap is not starting

Please try to take a look at the debug information. It might provide enough information for you to solve the issue for yourself. If it doesn't help you, don't hesitate to report your problem description together with debug information.

[Linux] Normcap does not show up in system tray

Is your display environment Gnome Shell? Then you probably need to install a Gnome Shell extension to support showing applications in the top bar, e.g.:

[Linux] NormCap doesn't show a notification after capture

NormCap's notifications depend on the system tray functionality. If you start NormCap, but its Icon doesn't appear in the system tray, proceed like in the question above.

[Linux] Could not load the Qt platform plugin xcb

In case you get the following output...

$ normcap -v debug
12:06:34 - INFO    - normcap.app            - L:32  - Starting Normcap v0.2.0
12:06:34 - DEBUG   - normcap.utils          - L:199 - [QT] L:0, func: None, file: None
12:06:34 - DEBUG   - normcap.utils          - L:200 - [QT] QtInfoMsg - Could not load the Qt platform plugin "xcb" in "" even though it was found.
12:06:34 - DEBUG   - normcap.utils          - L:199 - [QT] L:0, func: None, file: None
12:06:34 - DEBUG   - normcap.utils          - L:200 - [QT] QtFatalMsg - This application failed to start because no Qt platform plugin could be initialized. Reinstalling the application may fix this problem.
Available platform plugins are: eglfs, linuxfb, minimal, minimalegl, offscreen, vnc, wayland-egl, wayland, wayland-xcomposite-egl, wayland-xcomposite-glx, webgl, xcb.

... the chances are, some system requirements are outdated. You can check this with apt list "libxcb-util*":

$ apt list "libxcb-util*"
Listing... Done
libxcb-util-dev/hirsute 0.4.0-1 amd64
libxcb-util-dev/hirsute 0.4.0-1 i386
libxcb-util0-dev/hirsute 0.4.0-1 amd64
libxcb-util0-dev/hirsute 0.4.0-1 i386
libxcb-util1/hirsute,now 0.4.0-1 amd64 [installed,automatic]
libxcb-util1/hirsute 0.4.0-1 i386

Is only libxcb-util0 shown but libxcb-util1 is missing? Then you can try to create a symlink for the missing version:

sudo ln -s /lib/x86_64-linux-gnu/libxcb-util.so.0 /lib/x86_64-linux-gnu/libxcb-util.so.1
[Linux] AppImages require FUSE to run

This is not a NormCap issue but a requirement for AppImages. You need to make sure, that the FUSE library is installed on your system. E.g. on Ubuntu 22.04 you need to run sudo apt install libfuse2. See this blog post for details.

[macOS] When NormCap is started, an empty desktop shows up

This issue usually occurs on the after installing NormCap, either for the first time or after an update.

This is a known issue related to macOS's permissions settings: If NormCap doesn't have the system's permission to take a screenshot, an empty desktop will be shown.
(To be precise: NormCap doesn't know that it lacks permissions, tries to take a screenshot nevertheless, which results in a screenshot of the empty desktop.)

Steps to solve this:

  1. Close NormCap, if it is running.
  2. Navigate to "System Preferences" → "Security & Privacy" → "Privacy" → "Screen Recording" → "Click unlock".
  3. Do you already see "NormCap" on the right side? If yes, "remove" [ – ] it. Un-ticking the checkbox is not enough!
  4. Click "add" [+] → "Applications" → "NormCap".
  5. Confirm that you see NormCap on the right side with a checkmark in front of it.
  6. Start NormCap, it should work now.
  7. You might need to repeat those steps after installing a new version of NormCap.

Hopefully, this cumbersome user experience can be improved in a future release.

Development

"No such file or directory" error when running briefcase build

To verify, if this is the issue you are facing, run the docker image interactively and try to run the linuxdeploy-*.AppImage file there:

$ docker run -it \
  --volume /home/<USER>/<PROJECT PATH>/normcap/linux:/app:z \
  --volume /home/<USER>/.briefcase:/home/brutus/.briefcase:z \
  --env VERSION=0.2.0 briefcase/eu.dynobo.normcap:py3.9 \
  /bin/bash
$ /home/brutus/.briefcase/tools/linuxdeploy-x86_64.AppImage

If that results in a `No such file or directory` error, according to this issue and this one a workaround is to correct the "magic" bytes of the AppImage. This worked for me:

sed '0,/AI\x02/{s|AI\x02|\x00\x00\x00|}' -i linuxdeploy-x86_64.AppImage

Python package

An advanced installation method as alternative to the prebuild packages.

Comparison to prebuild packages

Prebuild:

  • Easier to install
  • Better system integration
  • No admin rights required

Python package:

  • Slightly faster startup
  • Requires an installation of Python >=3.9
  • Might need less disk space
Install on Linux
  1. Install dependencies:
    Note: wl-clipboard can be omitted on X11 based systems

    • Ubuntu/Debian:
      sudo apt install build-essential tesseract-ocr tesseract-ocr-eng
                          libtesseract-dev libleptonica-dev wl-clipboard
    • Arch:
      sudo pacman -S tesseract tesseract-data-eng wl-clipboard
    • Fedora:
      sudo dnf install tesseract wl-clipboard
    • openSUSE:
      sudo zypper install python3-devel tesseract-ocr
                          tesseract-ocr-devel wl-clipboard
  2. Install NormCap:
    pip install normcap
  3. Run:
    ./normcap
Install on macOS
  1. Install dependencies:
    brew install tesseract tesseract-lang
  2. Install NormCap:
    pip install normcap
  3. Run:
    ./normcap
Install on Windows
  1. Install "Tesseract 5", e.g. by using the installer provided by UB Mannheim.
  2. Set the environment variable TESSDATA_PREFIX to Tesseract's data folder, e.g.:
    setx TESSDATA_PREFIX "C:\Program Files\Tesseract-OCR\tessdata"
  3. Append Tesseract's location to the environment variable "Path", e.g.:
    setx Path "%Path%;C:\Program Files\Tesseract-OCR"
  4. Make sure to close and reopen your current terminal window to apply the new variables. Test it by running:
    tesseract --list-langs
  5. Install NormCap:
    pip install normcap
  6. Run:
    ./normcap